

Understanding the need for a GBA SP shell replacement
Why Consider Giving Your GBA SP a New Shell?
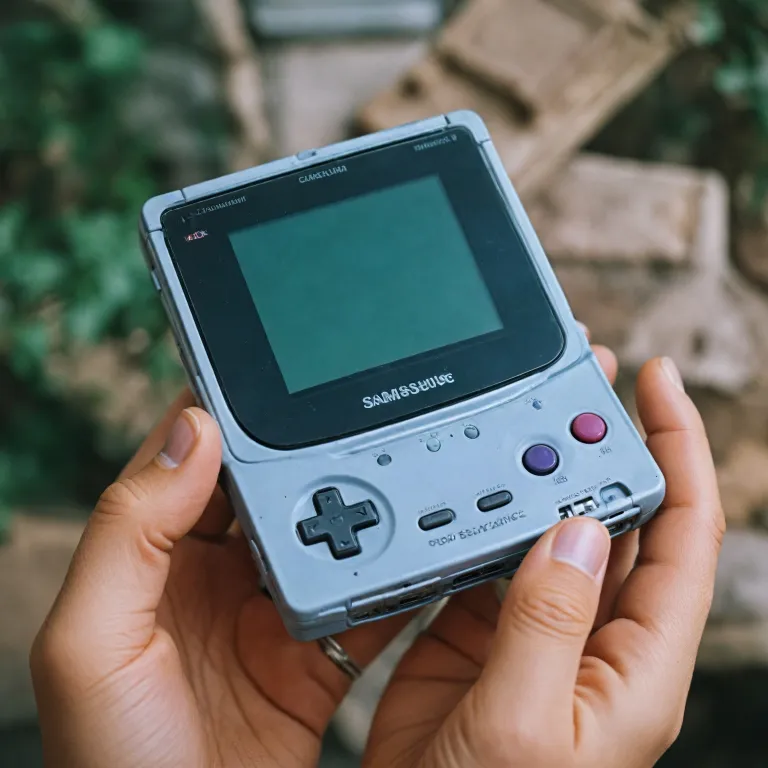
The Game Boy Advance SP, often called the GBA SP, is a classic handheld console that many gamers still love today. Over time, though, the original shell can show signs of wear—scratches, cracks, faded colors, or even broken buttons. These issues not only affect the look of your device but can also impact how it feels in your hands during gameplay. If you want your gameboy to look and feel as good as new, a replacement shell is a great solution.
- Restoring Appearance: A fresh shell can make your GBA SP look like it just came out of the box. Whether you prefer a clear, custom replacement or a classic color, there are many shells available to match your style.
- Improving Durability: New shells, especially those from trusted brands like Extremerate, often use stronger materials than the original. This means your gameboy advance will be better protected against drops and daily use.
- Enhancing Functionality: Some upgraded replacement shells are designed to be IPS ready, making them compatible with modern screen upgrades. If you want a brighter, clearer display, choosing an IPS compatible shell is a smart move.
- Cost-Effective Upgrade: Compared to buying a new console, replacing the shell is a budget-friendly way to refresh your device. The regular price for a replacement full set, including shells and buttons, is usually much lower than the price of a new unit.
When you’re ready to upgrade, you’ll find a wide range of shells, buttons, and screen options for sale. Whether you want a standard LCD or an IPS standard screen, there’s a shell set to fit your needs. If you’re also thinking about other easy upgrades, like swapping out your battery cover, check out this guide to choosing and replacing your Game Boy Advance battery cover for more tips.
Replacing your GBA SP shell is a great way to keep your favorite handheld looking and playing great. In the next sections, we’ll explore how to choose the right shell, what tools you’ll need, and how to complete the replacement step by step.
Choosing the right replacement shell
Key Factors When Selecting Your New Shell
When it comes to giving your Game Boy Advance SP a fresh look, choosing the right replacement shell is crucial. There are many options on the market, from standard shells to upgraded replacement kits. Here’s what you should consider to ensure your upgrade is both stylish and functional.
- Compatibility: Not all shells fit every model. Make sure your chosen shell is gba compatible and supports your specific unit, whether you have a standard LCD or an ips ready screen. Some shells are labeled as ips standard or compatible ips, which means they’re designed for upgraded screens. Double-check the product description for terms like advance gba or gameboy advance to avoid surprises.
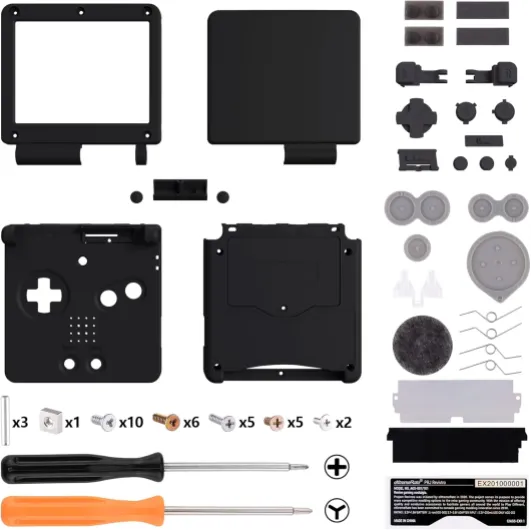
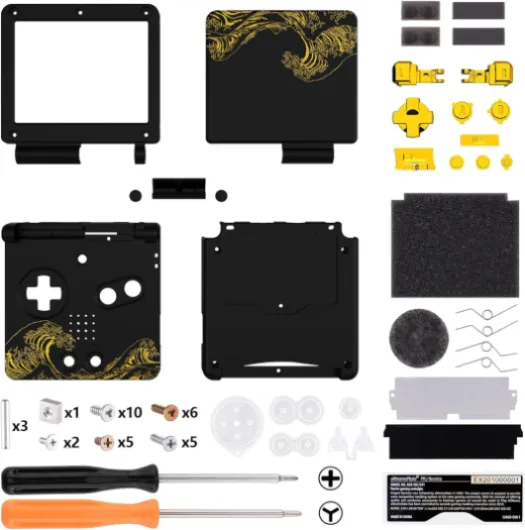
- Material and Finish: Shells come in various finishes, such as clear, matte, or glossy. Brands like extremerate offer a wide range, including great wave designs and custom replacement options. Decide if you want a regular look or something that stands out.
- Included Components: Some replacement full kits come with shells buttons and a set buttons for a complete refresh. Others may only include the shell, so you’ll need to source buttons gameboy separately. A full set can save you time and ensure color consistency.
- Price and Value: Shells range in unit price and sale price. While a higher price can mean better quality, there are great options at a regular price too. Consider your budget and the value you get—some kits include tools or are ready upgraded for ips screens, which can justify a higher cost.
- Brand Reputation: Established brands like extremerate are known for quality and fit. Reading reviews and checking community feedback can help you avoid shells that don’t align properly or have poor build quality.
Popular Shell Options and What Sets Them Apart
| Shell Type | Screen Compatibility | Included Buttons | Finish | Price Range |
|---|---|---|---|---|
| Standard Replacement | Standard LCD | Optional | Matte, Glossy | Low to Medium |
| IPS Ready Upgraded | IPS, Standard LCD | Usually Included | Clear, Custom | Medium to High |
| Custom Replacement | Gameboy Advance SP | Full Set | Great Wave, Unique Art | Medium to High |
Whether you’re after a replacement full kit or just a new shell, take your time to compare options. For a deeper dive into the Game Boy Advance SP and its accessories, check out everything you need to know about the Game Boy Advance SP with charger. This will help you make an informed decision and ensure your console looks and feels great for your next game session.
Essential tools and preparation
Gathering Your Tools and Getting Ready
Before you start replacing your Game Boy Advance SP shell, it’s important to have all the right tools and supplies on hand. This helps avoid delays and ensures your replacement goes smoothly. Whether you’re upgrading to a clear shell, a custom replacement, or an IPS ready shell, preparation is key.
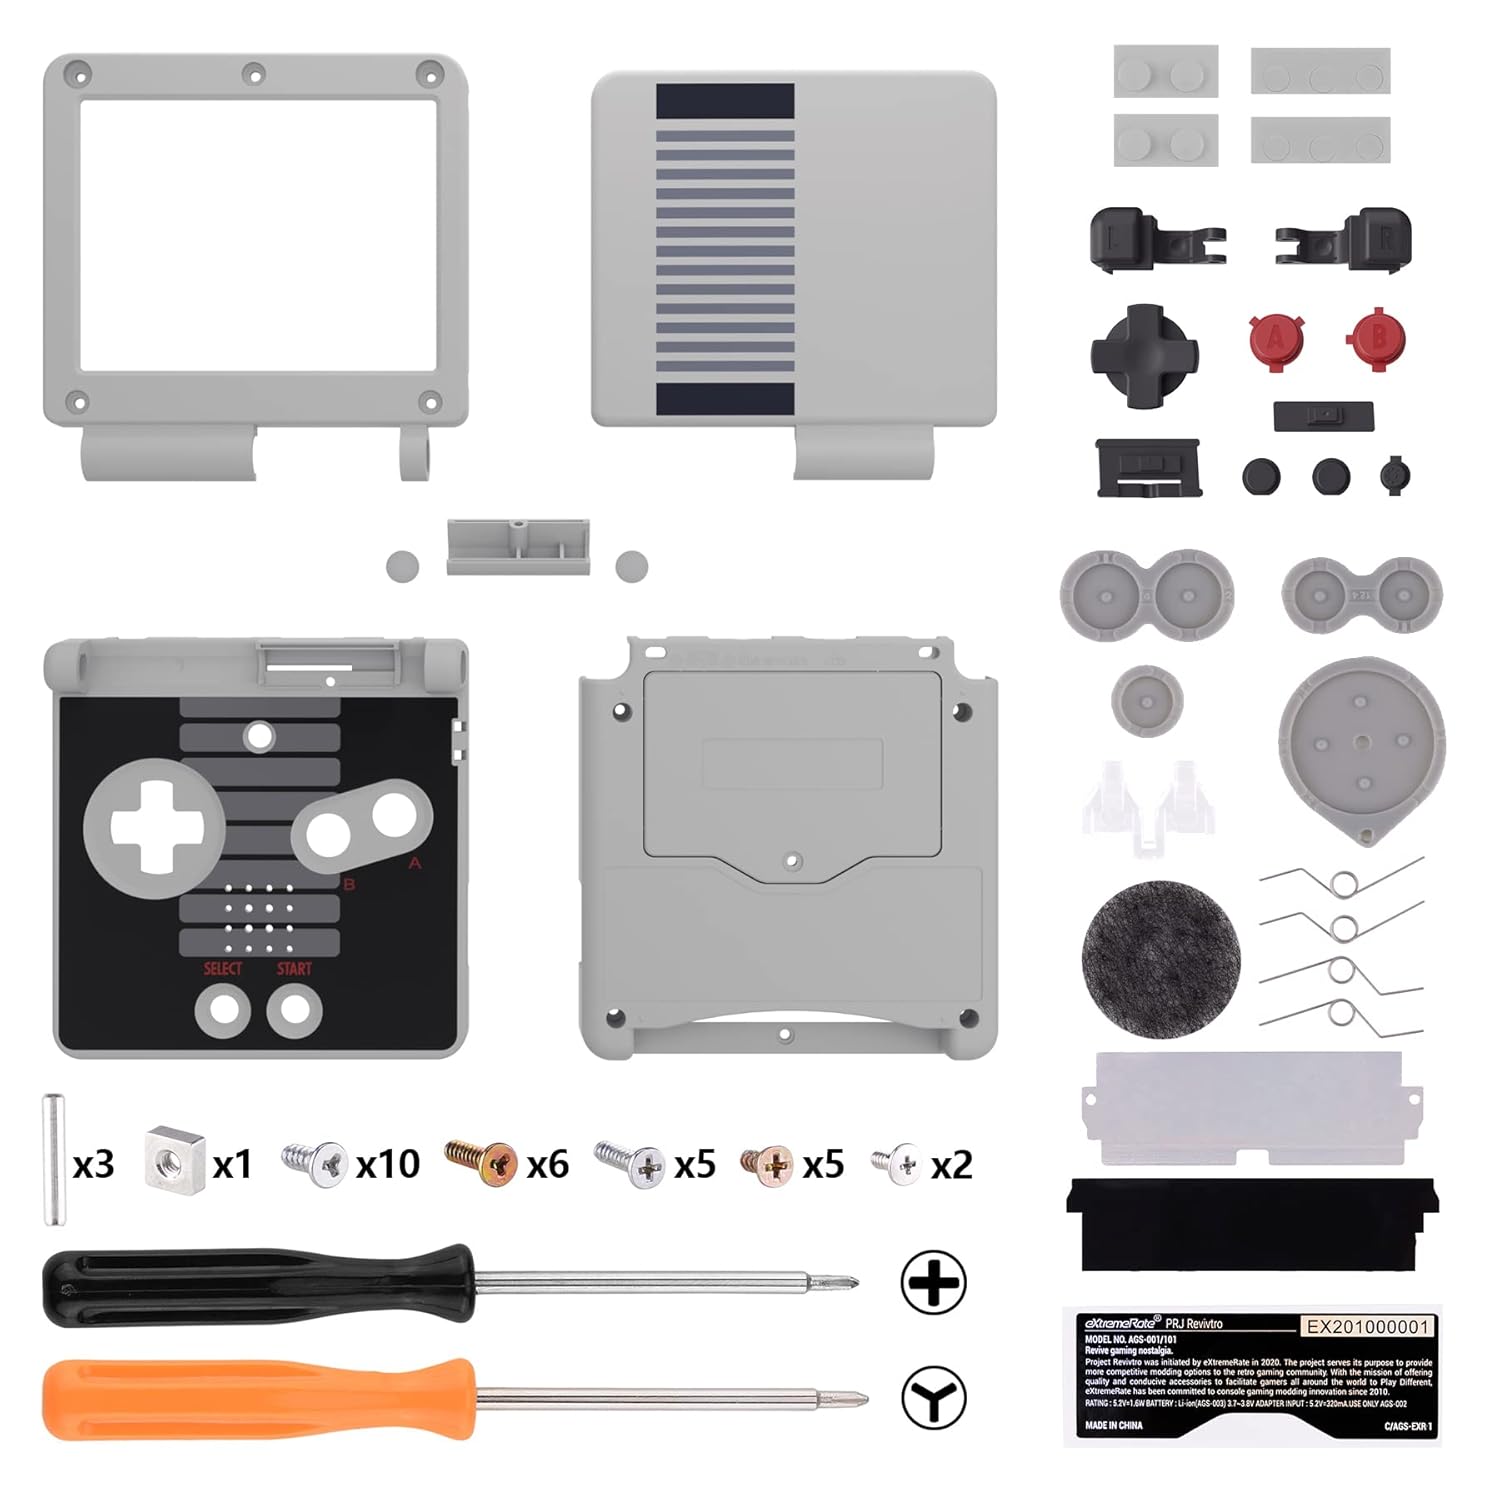
- Replacement Shell: Choose a shell that matches your style and needs. Brands like Extremerate offer a wide range of shells and buttons for the GBA SP, including IPS compatible and standard LCD options. Make sure your shell is GBA compatible and check if it’s a full set with buttons included.
- Buttons and Screws: Some replacement full sets come with new buttons and screws. If not, you may need to purchase these separately to match your new shell.
- Essential Tools: You’ll need a tri-wing screwdriver, a small Phillips screwdriver, and a plastic prying tool. These are crucial for safely opening your Game Boy Advance SP and removing the old shell without damaging the unit.
- Workspace Preparation: Set up a clean, well-lit area. Use a small container or tray to keep track of screws and small parts. This helps prevent losing any components during the process.
- Screen Considerations: If you’re upgrading to an IPS screen or using an IPS standard shell, make sure your replacement shell is IPS ready. Some shells are designed specifically for upgraded replacement screens, while others fit the regular price standard LCD.
- Reference Guides: It’s helpful to have a step-by-step guide or video tutorial ready. For a deeper dive into Game Boy models and their compatibility, check out this closer look at Game Boy Color games to understand more about the evolution of shells and screens.
Having these tools and supplies ready will make your shell replacement project much easier. Whether you’re going for a great wave design, a clear shell, or a custom replacement, being prepared is the first step to a successful upgrade.
Step-by-step guide to replacing your GBA SP shell
Disassembling Your Game Boy Advance SP
- Start by powering off your GBA SP and removing any game cartridge and battery. This ensures safety and prevents accidental damage.
- Using the right screwdriver (typically a tri-wing and a small Phillips), carefully remove all screws from the shell. Keep them organized, as you’ll need them for reassembly.
- Gently separate the top and bottom halves of the shell. Take your time—forcing the shell can crack the plastic or damage internal components.
Transferring Internal Components
- Lift out the motherboard, screen, and button membranes. If your replacement shell is IPS ready or compatible with an upgraded replacement screen, now is the time to install your new IPS or standard LCD.
- Carefully transfer the buttons, membranes, and any rubber pads to the new shell. Make sure the set buttons and shells buttons are seated correctly for smooth gameplay.
- If your replacement full shell includes a new hinge or screen lens, install these as well. Double-check that the screen is dust-free before sealing the shell.
Reassembling and Testing
- Place all internal components into the new shell, ensuring everything aligns with the screw posts and button cutouts.
- Secure the shell with the original screws. Don’t overtighten, as this can strip the plastic.
- Insert the battery and power on your Game Boy Advance SP. Test all buttons, the screen, and the sound. If you’ve chosen a custom replacement or upgraded replacement shell, check that the fit and finish meet your expectations.
Tips for a Great Finish
- Use a clear shell or a great wave design for a unique look. Many shells from brands like Extremerate offer a variety of styles at a regular price or sale price, so you can match your personal taste.
- For the best results, consider a full set that includes shells, buttons, and screen lens. This ensures color matching and a professional appearance.
- Always compare unit price and compatibility—some shells are only gba compatible or specifically designed for ips ready upgraded screens.
With patience and the right tools, your Game Boy Advance SP will look and feel like a brand new game unit, ready for hours of advance gba gaming.
Troubleshooting common issues after replacement
Common Problems After a Shell Swap
After installing a new shell on your Game Boy Advance SP, you might run into a few issues. These are normal, especially if you’re using upgraded replacement shells, custom replacement sets, or compatible IPS-ready shells from brands like Extremerate. Here’s how to spot and solve the most common problems:
- Buttons Not Responding: If your buttons or set buttons feel sticky or unresponsive, double-check their alignment. Sometimes, the shells buttons or the rubber pads underneath can shift during assembly. Make sure everything sits flat and that the buttons gameboy compatible pieces are in the correct slots.
- Screen Issues: If your LCD or IPS screen doesn’t display correctly, confirm that the ribbon cable is fully inserted. For IPS-ready upgraded replacement shells, ensure the screen sits flush and the shell isn’t pressing on the display. Standard LCD and IPS standard screens require careful handling to avoid damage.
- Shell Not Closing Properly: If the shell won’t close or gaps appear, check for leftover plastic from the molding process. Trim any excess with a hobby knife. Also, verify that all internal components are seated correctly in the replacement full shell.
- Sound Problems: If the speaker isn’t working, make sure the contacts are clean and that the speaker is positioned correctly in the new shell. Sometimes, the shell design can affect sound if not installed properly.
- Battery Not Fitting: Some shells, especially clear or custom replacement units, might have slightly different dimensions. Ensure your battery fits snugly and the contacts align. If you’re using a shell from a sale price or unit price batch, double-check for any manufacturing differences.
Tips for a Smooth Experience
- Test your Game Boy Advance SP before fully screwing the shell together. This lets you catch issues early.
- Keep all screws and small parts organized. Using a tray or magnetic mat can help avoid losing anything during the process.
- If you’re using a compatible IPS or upgraded replacement screen, follow the manufacturer’s instructions closely for the best results.
- Don’t force any parts. If something doesn’t fit, double-check the orientation and compare with your original shell or buttons.
With patience and attention to detail, your Game Boy Advance SP will look and feel great in its new shell, whether you chose a regular price standard shell or a full custom set. If you run into persistent issues, consider reaching out to the shell manufacturer or browsing community forums for advice on your specific model and shell type.
Personalizing your GBA SP after the shell replacement
Creative Ways to Make Your GBA SP Stand Out
Once your replacement shell is installed, your Game Boy Advance SP is ready for a new level of customization. The shell is just the beginning—there are plenty of ways to make your handheld unique and reflect your personal style.- Mix and Match Shells and Buttons: Many brands, like Extremerate, offer a wide range of shells and buttons in different colors and finishes. Whether you prefer a clear shell, a great wave pattern, or a classic look, you can combine shells and buttons for a custom replacement set that stands out from the regular price options.
- Upgrade Your Screen: If you opted for an IPS ready shell, consider installing an upgraded replacement IPS LCD. This not only enhances your gaming experience with a brighter, clearer screen but also adds a modern touch to your retro device. Make sure your shell is compatible IPS and fits the screen size you want—some shells are specifically designed for IPS standard or standard LCD screens.
- Custom Stickers and Decals: Adding decals or stickers is a simple way to personalize your GBA SP. Choose themes that match your favorite game or color scheme. This is a great option if you want to change up the look without committing to a full replacement.
- Button Swaps: Swapping out the buttons gameboy style or using a set buttons in a contrasting color can give your unit a fresh feel. Some sets come with shells buttons included, making it easy to coordinate the look.
- Personalized Accessories: Look for compatible accessories like cases, pouches, or screen protectors that match your new shell. These not only protect your device but also add another layer of style.
What to Consider When Personalizing
- Compatibility: Always check if the shell, buttons, and screen are gba compatible and fit your specific model. Not all shells are suitable for every version of the Game Boy Advance SP.
- Quality and Price: The price can vary depending on whether you choose a regular shell or an upgraded replacement. Brands like Extremerate are known for their quality, but there are also great options at a lower unit price.
- Installation: Some customizations, like installing an IPS screen, require more technical skill than a standard shell swap. Make sure you’re ready and have the right tools before starting.