Five essential Game Boy mods that make original hardware worth playing every day
This Game Boy mod guide walks through five core upgrades—IPS screen, power, shell and controls, audio, and flash cartridge—that turn a nostalgic handheld into a daily‑use retro console, with concrete kit examples and practical build tips.
Why a modded Game Boy beats stock hardware for daily play
A stock Nintendo Game Boy is charming, but its original screen and speaker hold it back. When you compare unmodified Game Boy systems to modern handheld consoles, the washed‑out LCD displays, weak audio, and battery hunger turn a nostalgia piece into a shelf ornament. A focused Game Boy mod guide will help you turn that same shell into a handheld you actually use every day, whether you prefer a DMG, Game Boy Color, or Game Boy Advance.
The first decision is which model you want to build around, because Game Boy Color, Game Boy Pocket, Game Boy Advance and the classic DMG‑01 each have different strengths. A DMG Game Boy with its brick form factor offers huge internal space for almost any kit, while a Game Boy Pocket feels better in the hand but gives you less room for boards, batteries, and extra wires. Many modders keep several Game Boy consoles so they can tailor one build to original game cartridges, another to a flash cart, and a third to experimental kits with wild color shells or backlit buttons.
Think about how you actually play, not just what looks good in a list of famous titles. If you want to replay every original game you own on original hardware, prioritise reliability upgrades like a new power switch, fresh screen lenses, and a stable front PCB before chasing exotic displays. If you mostly want a portable way to enjoy Game Boy, Game Boy Color and some Game Boy Advance titles, you might compare a fully built Game Boy modding project against modern GBA consoles or even a renewed home console such as a tested PlayStation 5 disc edition for living room play, then decide which device becomes your main retro platform.

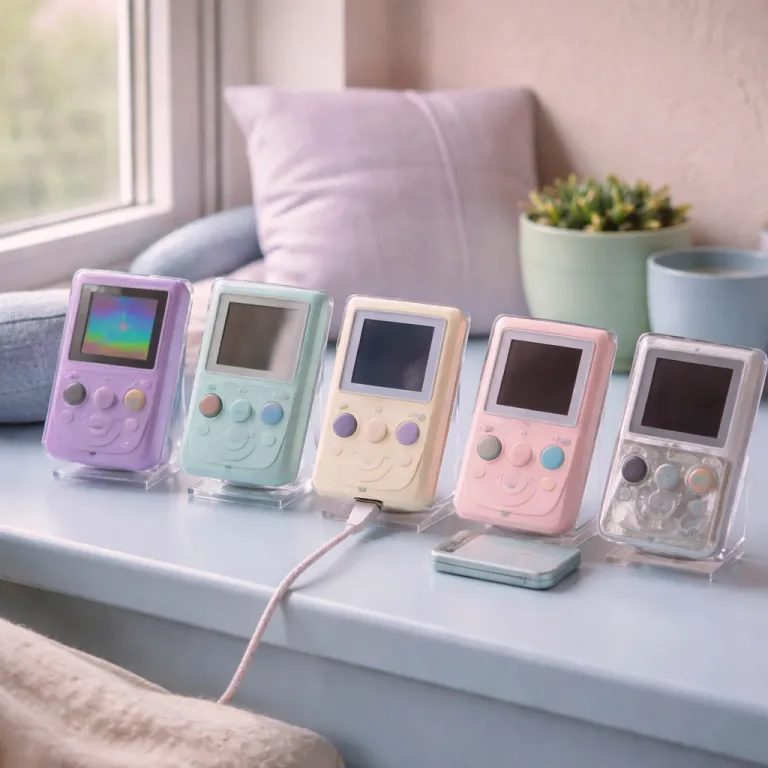
IPS screen upgrades: the single biggest quality of life jump
The heart of any serious Game Boy mod guide is the IPS screen upgrade, because visibility changes everything. An IPS screen replaces the dim original panel with a bright, sharp color display that finally lets you see fine sprite details in every game. Once you play a Game Boy Color title with a modern IPS panel, going back to the old LCD displays feels like putting on sunglasses indoors, especially in daylight or under LED room lighting.
For DMG and Game Boy Pocket builds, a good IPS screen kit usually includes the panel, a ribbon cable, a small driver board, and sometimes a touch sensor or extra button for brightness control. Popular examples include FunnyPlaying DMG IPS kits and Cloud Game Store DMG backlit panels, which are designed around common shell templates. On Game Boy Color and Game Boy Advance models, the better kits add features like multiple color temperature presets, pixel scaling modes that mimic the original Game Boy grid, and optional on‑screen display menus; FunnyPlaying V2 GBC IPS kits and IPS V2 GBA kits are typical reference points for price and compatibility. Expect to trim plastic inside most shells, because these displays are larger than the original screen and the front PCB area needs space for the new frame.
Installation difficulty varies by kit, but the basic steps repeat across models and kits. You open the console, disconnect the original LCD, attach the new ribbon cable to the motherboard, mount the IPS panel in the shell, and route any required wires for brightness or color controls to a spare pad or button. For a DMG IPS install, many builders follow a step‑by‑step process: dry‑fit the panel, mark the inner shell with a pencil, trim in small passes, then test the screen before final adhesive. If you are not ready to cut your original shells, start with aftermarket custom shells designed for IPS displays, or even consider a factory modern handheld like the Switch Lite Dialga Palkia Edition, which you can see reviewed as a compact alternative on this dedicated Switch Lite test page.
- Mod #1 – IPS screen kit (DMG, Game Boy Color, Game Boy Advance)
Typical parts: IPS LCD panel, driver PCB, ribbon cable, adhesive, optional touch sensor.
Common vendors: specialty retro mod shops and marketplace sellers that focus on Game Boy IPS kits, such as FunnyPlaying‑style sets and DMG‑specific panels from Cloud Game Store–type suppliers.
Price range: roughly $45–$80 depending on model and features, with DMG and Game Boy Color kits at the lower end and advanced GBA IPS kits at the top.
Difficulty & time: intermediate; 1–2 hours including shell trimming, alignment, and on‑screen configuration.
Power, shells and controls: making the handheld feel truly modern
Once the screen is sorted, power and comfort decide whether your Game Boy becomes a travel companion or stays on the desk. Swapping AA batteries for a rechargeable kit with a lithium pack and USB‑C charging turns the old power switch into a modern on‑off control that you barely think about. A well‑tuned battery board will give you several hours of play on an IPS screen without the weight and waste of disposable cells, and boards modeled after CleanJuice‑style DMG and GBA packs or RetroSix CleanPower regulators are common reference designs.
Shells matter more than most newcomers expect, because poor‑fitting plastic can creak, flex, and misalign every button. The kit market for custom shells is crowded, and only some brands match or exceed the tolerances of the original shells from Nintendo. Before you buy, study a detailed guide such as this analysis of how to choose the right GBC shell template for a custom Game Boy Color build, then apply the same logic to DMG, Game Boy Pocket and Game Boy Advance projects, checking that the shell explicitly supports IPS screen windows and USB‑C cutouts if you plan those upgrades.
Controls deserve the same care as displays, because a perfect IPS panel means little if your controller inputs feel mushy. High‑quality rubber membranes under each button, a clean front PCB, and properly seated screen lenses all contribute to precise, reliable presses in fast‑paced game situations. Many modders keep a small list of titles like Tetris, Super Mario Land, and fast‑action Game Boy Color shooters to test every direction, button, and the power switch after each install, treating this as a quick troubleshooting checklist before closing the shell for good.
- Mod #2 – Rechargeable battery and power board
Typical parts: lithium‑ion pack, charging PCB, USB‑C or micro‑USB port, wiring harness.
Common vendors: retro handheld mod suppliers and electronics hobby stores that stock CleanJuice‑style battery packs, RetroSix‑inspired power regulators, and generic USB‑C charge modules.
Price range: about $25–$45 depending on capacity and charging features, with USB‑C and battery indicators usually costing more than basic micro‑USB boards.
Difficulty & time: intermediate; 1–1.5 hours with basic soldering, shell cutting for the charge port, and final continuity checks. - Mod #3 – Replacement shell and control set
Typical parts: aftermarket shell, buttons, rubber membranes, new screen lens.
Common vendors: Game Boy shell specialists and custom handheld parts shops that offer IPS‑ready DMG, Game Boy Color, and Game Boy Advance shells with matching button sets.
Price range: roughly $20–$40 for a full shell and button kit, with premium painted or limited‑run colorways at the higher end.
Difficulty & time: beginner to intermediate; 45–90 minutes including full teardown, reassembly, and test‑fitting the IPS screen and power board.
Audio, flash cartridges and the real cost of a fully modded build
Audio is the quiet hero of any Game Boy mod guide, because the stock speaker is thin and easily drowned out by street noise. A small amplifier board and a better speaker cost less than a premium screen kit, yet they transform the chiptune soundtracks of classic Game Boy games into something closer to a tiny portable radio. When you combine a clean amp with a solid shell and tight button feel, the handheld finally matches the emotional punch of your memories, especially for titles with rich soundtracks like Link’s Awakening or Pokémon Crystal.
Flash cartridges change how you use the console day to day, especially if you own several GBA consoles or multiple Game Boy Color units. A good flash cart lets you carry a curated list of your favourite titles on one cartridge, while still using original Game Boy hardware and respecting your own cartridge collection. Common examples include EverDrive‑GB‑style carts, EZ‑Flash Jr.–type Game Boy Color flash cartridges, and Omega‑style GBA flash carts, which typically rely on microSD storage and menu‑based game selection. Legal lines vary by region, but backing up games you own and avoiding commercial ROM distribution keeps you on the safer side of the grey area.
Cost is where you should stay brutally honest, because a fully built DMG or Game Boy Color with IPS screen, audio amp, rechargeable kit, and custom shells can approach the price of an Analogue Pocket. The Pocket offers a superb color screen and FPGA accuracy out of the box, while a modded original will give you the tactile authenticity of the original screen layout, the original controller feel, and the satisfaction of doing the install yourself. For many players, the choice is not either‑or, but which device becomes the couch companion and which stays on the shelf as a reference piece, especially if you already own a Switch Lite or similar modern handheld.
- Mod #4 – Audio amplifier and upgraded speaker
Typical parts: compact amp PCB, high‑efficiency speaker, short wiring leads.
Common vendors: retro audio mod suppliers and general electronics parts stores that stock PAM8302‑style mini amps, DMG‑sized speakers, and pre‑tinned hookup wire.
Price range: around $15–$30 depending on brand and power output, with integrated amp‑and‑speaker kits usually costing a little more than bare boards.
Difficulty & time: intermediate; 45–60 minutes with careful soldering, polarity checks, and test fitting to avoid shell buzz. - Mod #5 – Flash cartridge for Game Boy and Game Boy Color
Typical parts: Game Boy or Game Boy Color flash cart with microSD storage.
Common vendors: established flash cart makers and retro cartridge retailers that sell EverDrive‑GB‑style, EZ‑Flash Jr.–type, and similar multi‑game cartridges.
Price range: roughly $40–$90 depending on save features, real‑time clock support, and compatibility with both original Game Boy and Game Boy Color titles.
Difficulty & time: beginner; 10–20 minutes to update firmware, load ROM backups, and test basic save and load behaviour.
Practical build tips: wiring, boards and avoiding common modding mistakes
Good Game Boy modding is less about exotic parts and more about clean technique, especially when you start dealing with solder wire and fragile ribbon cable connections. Take your time when you install any new board, because lifting pads on the front PCB or main motherboard is the fastest way to turn a working Game Boy into a parts donor. A simple rule helps here: if your hands are shaking or you feel rushed, you stop and come back later, rather than forcing a joint or over‑tightening shell screws.
Plan your wiring before you melt any solder wire, particularly on compact Game Boy Pocket and Game Boy Advance builds where space is tight. Route wires along the edges of the shells, avoid crossing the hinge area on GBA models, and always check that no cable pinches when you close the case and toggle the power switch. Many IPS screen kits include diagrams for safe wire paths, but you should still dry‑fit the screen, the board, and the buttons before committing to a final layout, then run a short troubleshooting checklist: power on with the shell open, verify backlight, test audio, and confirm every button input.
Keep spare parts on hand, because even experienced modders crack screen lenses or damage an original screen while experimenting with new displays. Having extra kits, buttons, and shells ready means a mistake will not stall your entire project for weeks while you wait for the kit market to restock. Over time, you will build a small workshop of Game Boys in various states of assembly, and that is when the hobby shifts from a single upgrade to a long‑term craft, with your own notes on which IPS kits, battery boards, and flash cartridges pair best with each Game Boy model.
FAQ
Is an IPS screen upgrade worth it for every Game Boy model?
An IPS screen upgrade is the single most impactful mod for almost every Game Boy, because it fixes the biggest flaw of the original LCD displays. On DMG and Game Boy Color units, the jump from the original screen to a bright color screen is dramatic in both daylight and indoor play. The only time it might be less essential is if you mainly collect sealed consoles and rarely play them, or if you already rely on an Analogue Pocket or similar FPGA handheld for most of your retro gaming.
Do I need soldering skills to follow a Game Boy mod guide?
Some modern kits are designed for minimal soldering, especially basic IPS screen kits that rely on drop‑in ribbon cable connections. However, the cleanest installs for audio amps, rechargeable power boards, and advanced controller features usually require at least a few precise solder wire joints. If you are new, practice on scrap boards first and start with a less rare Game Boy before touching a prized Game Boy Pocket or Game Boy Advance, and keep a simple checklist nearby so you do not forget power, audio, and button tests.
Will a rechargeable battery kit damage my original board over time?
A well‑designed rechargeable kit that matches the voltage and current requirements of the original board will not harm a healthy console. Problems arise when builders mix unknown batteries, cheap charging boards, and poorly insulated wires inside tight shells. Choose reputable kits, follow the install instructions carefully, and always test for heat buildup near the power switch area during the first long play sessions, especially when using higher‑capacity lithium packs.
Can I keep the original look while upgrading the screen and audio?
It is possible to retain the original shells and overall color scheme while still adding an IPS screen, a better speaker, and even a subtle audio amplifier board. Many modders reuse the original screen lenses or source high‑quality replacements that match the factory tint and logo placement. The key is to avoid overly flashy custom shells if you want a console that looks stock at a glance but feels modern in use, and to choose IPS kits with neutral color profiles rather than heavily saturated presets.
How does a fully modded Game Boy compare to modern handhelds?
A fully modded DMG, Game Boy Color, or Game Boy Advance with a quality IPS screen, strong audio, and a flash cartridge can feel surprisingly competitive with modern handhelds for 8‑bit and 16‑bit style games. Devices like the Switch Lite or premium emulation handhelds offer more raw power and a broader game library, but they cannot replicate the exact controller feel and cartridge ritual of original Game Boys. Many enthusiasts end up using modern systems for new releases and keeping a favourite modded Game Boy as their dedicated retro companion, especially for long‑term playthroughs of classic Game Boy and Game Boy Color titles.