Understanding Xbox Controller Customization
Unlocking the Potential of Xbox Controller Customization
For many gamers, the standard Xbox wireless controller might not fully satisfy their specific preferences and style. This is where customization comes into play, offering a tailored gaming experience that can enhance both your performance and comfort.
Creating your own Xbox controller involves a combination of personal creativity and technical know-how. Custom controllers allow you to design unique patterns, tailor button layouts, and choose colors that reflect your personality, turning a regular controller into an extension of your gaming identity. Whether opting for the Xbox elite series with its advanced features or the standard wireless model, understanding customization is key to building your dream equipment.
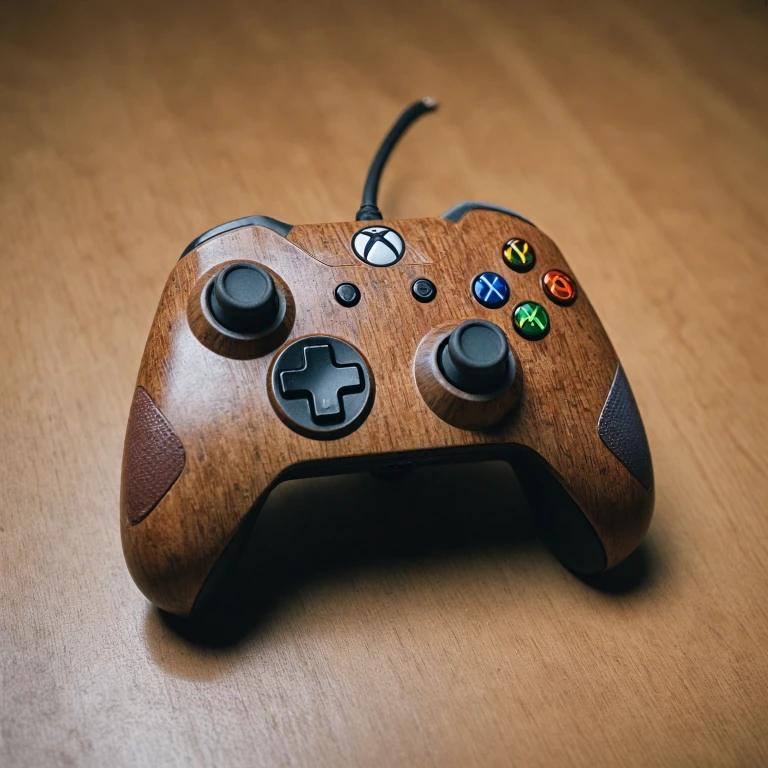
As players explore the vibrant world of Xbox design lab, they discover options for every preference, from the pro gamer seeking edge performance to casual players wanting a more visually appealing controller. You have the liberty to fill your controller with dynamic, vibrant designs or opt for a simplistic, sleek look.
To explore vibrant design options further and view the impact of such custom creations, it's essential to draw inspiration from different gaming consoles and their custom controllers available in the market.
Essential Tools and Materials
Gathering the Necessary Items for Your Custom Controller Build
To start crafting your own Xbox controller, it's essential to gather the right tools and materials that will allow you to effectively modify or build your custom controller from scratch. Whether you are aiming to enhance your Xbox series performance or add a personal touch using the design lab, having the right equipment is paramount. Start by obtaining a high-quality screwdriver set tailored for electronics to safely open and reassemble your controller without damaging any parts. Additionally, a plastic spudger will be necessary to gently pry open the case of your controller without scratching or cracking its components. Here is a concise list of essentials you may need:- Screwdriver set: Ensure it has multiple sizes to fit the varied screws in Xbox controllers
- Plastic spudger: Helpful in opening the plastic casing without damage
- Precision tweezers: Useful for handling small parts
- Soldering iron: Needed for in-depth customization, especially in modifying circuitry
- Heat shrink tubing: For insulating wires during complex electrical modifications
- Paints or decals: To customize the exterior design
- Replacement parts (if needed): Such as buttons, shells or mod kits for premium designs like the Xbox Elite
Step-by-Step Guide to Building Your Controller
Step-by-step: Crafting Your Perfect Xbox Controller
Building your own custom Xbox wireless controller can be an exciting journey. Before you dive in, make sure you've gathered all the essential tools and materials that were discussed previously. Once you're ready, follow these steps to bring your design to life.- Disassemble Your Xbox Controller
- Begin by gently removing the outer casing of the Xbox controller. This usually involves unscrewing a few screws on the backside. Be careful not to damage any components.
- Layout Your Design
- Place your desired design elements such as button layouts, shell colors, and thumbstick styles. Consider utilizing tools like the Xbox Design Lab to visualize your custom creation before committing.
- Install New Components
- Swap out any standard parts you wish to replace with custom components. This could include installing new buttons, a fresh shell, or even a Pro thumbstick for enhanced performance. Each part will have specific installation instructions, so refer to them closely.
- Secure Internal Components
- Ensure that all internal components are securely connected. Loose parts can affect the controller’s functionality, so double-check everything before reassembly.
- Reassemble Your Xbox Controller
- Once everything is in place and secure, reattach the outer casing and fasten all screws tightly.
- Test the Functionality
- Before diving into a long gaming session, test your designed controller. Check if all buttons respond correctly and if the wireless connectivity is solid. Any issues here may require you to revisit your assembly steps.
Exploring Design Options
Personalize Your Experience with Unique Designs
Designing your Xbox controller is a creative endeavor that not only enhances your gaming experience but also allows you to express your personal style. The Xbox Design Lab offers a variety of custom options, enabling you to bring your vision to life. Consider these elements when crafting your perfect controller:- Colors: Start by selecting the primary and accent colors for different parts of your controller. Choose from an array of vibrant hues to match your mood or favorite game.
- Finishes: Think about the texture and feel of your controller. Do you prefer a sleeker look with a glossy finish, or a more rugged grip with a matte one? Each finish can impact the overall aesthetic and functionality.
- Button Configuration: Standard configurations work for most, but for a more tailored gaming experience, consider customizing the button layout. Whether you're building a custom Xbox Elite or a wireless Xbox Series controller, adjusting button placements could enhance performance.
- Text Personalization: Add a personal touch by engraving your gamertag or a unique message to make your controller truly one-of-a-kind.
Troubleshooting Common Issues
Addressing Potential Challenges in Customization
Even with the best tools and careful planning, customizing your Xbox controller can sometimes present challenges. It's crucial to tackle these issues head-on to maintain both the aesthetics and functionality of your device.- Fit and Alignment Issues: One common issue when assembling the components of your custom build, whether it's the wireless series or the elite model, involves the alignment of parts. Ensuring that each piece fits perfectly is essential to maintain the seamless operation of your controller. Double-check pre-designed templates and community guidelines to resolve misalignment problems.
- Wiring Challenges: Whether you're modifying a standard Xbox wireless or an upgraded pro model, dealing with intricate wiring is often part of the customization process. If encountering issues, verify your connections, especially when attempting to create your unique design features. There are numerous online forums where experienced gamers and modders share controller-specific solutions.
- Button Functionality: After customizing the design or adding additional buttons to your Xbox series controller, you might experience non-responsive buttons. Test each button’s connection thoroughly within the Xbox controller design lab framework to ensure your custom features work as intended.
- Surface Finish and Paint Concerns: When adding a personal touch to your Xbox controllers, the final look often depends on the paint or surface finish quality. If the design lacks luster, consider techniques like wet sanding or sealing your creations with a protective coat to increase durability and enhance your controller's edge.
Maintaining Your Customized Controller
Prolonging Your Custom Xbox Controller's Longevity
Maintaining a customized Xbox controller calls for a balance between careful handling and regular upkeep. From ensuring the flawless performance of your Xbox Series controller to preserving the aesthetic appeal of your pro-level elite build, here are some practical steps to keep in mind:- Regular Cleaning: Dust and debris can accumulate, especially in the crevices where design features meet. Use a soft, slightly damp cloth to gently wipe your controller. Avoid excessive moisture, as the Xbox wireless controller’s internal electronics can be sensitive to liquid.
- Inspect Connections: Check that your wireless controller maintains strong connections, whether it's with the battery ports or through Bluetooth pairing with your Xbox series console. Faulty connections can impact both the performance and the user experience.
- Functionality Testing: Regularly test your custom controller to ensure all components work correctly. Pay special attention to buttons, triggers, and thumbsticks, as these are often prone to wear and tear from intense gaming sessions.
- Keep it Cool: Avoid excessive exposure to heat which can warp or damage the controller’s shell or internal components. This is particularly important if your controller has been customized with intricate designs or paint that can be heat sensitive.
- Safe Storage: When not in use, store your custom Xbox controller in a protective case or on a display stand to prevent accidental falls or knocks.
